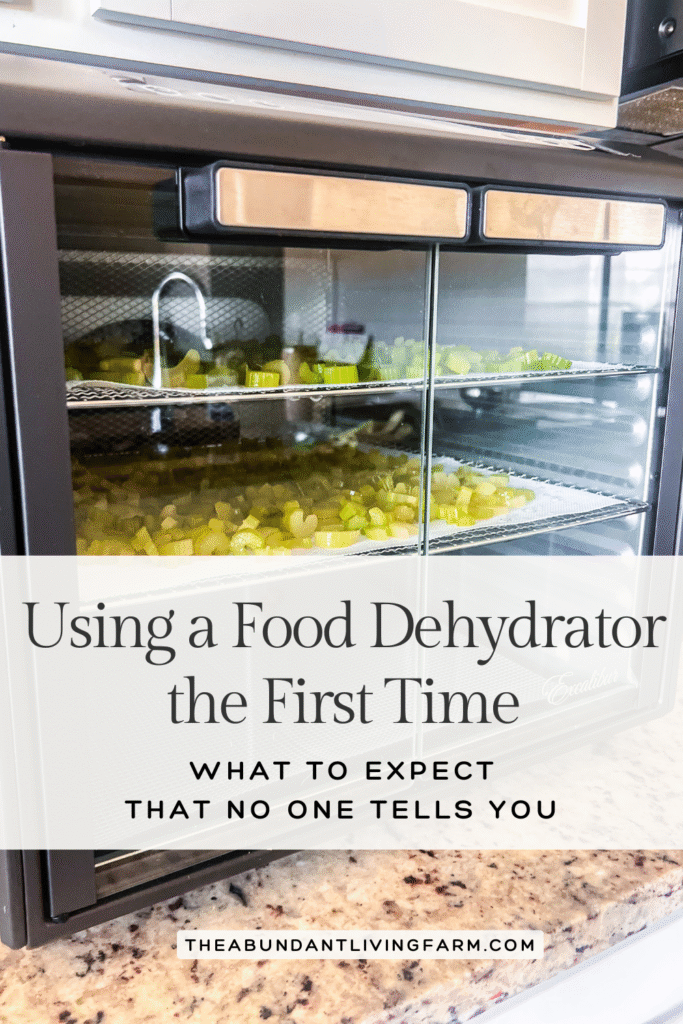
Using a Food Dehydrator the First Time: What to Expect that Most People Don’t Tell You | Homesteading Skills
Using a food dehydrator the first time can seem intimidating! But, we found it to be one of the simplest forms of preserving for both short-term and long-term food storage. Dehydrating is an easy way to preserve food, prepare your pantry, and save on storage space. However, my first time using a food dehydrator taught me things that no one else did. Here are some things to consider and expect when using a food dehydrator the first time!
This post may contain affiliate links. When you shop through them, I may earn a commission that blesses our family at no extra cost to you. Thank you!
Using a food dehydrator the first time can be intimidating! But, dehydrating is an easy way to preserve food, prepare your pantry, and save on storage space. However, my first time using a food dehydrator taught me things that no one else did. In this post, we discuss some things to consider and expect when using a food dehydrator the first time!
Hi, I’m Priscilla!
As a young, growing family facing job loss in 2013, with a toddler and a newborn baby, I wanted to learn how to grow food to supplement our rising grocery bill, but I had no experience. So, I called on my mom to help me start my first garden as cheap as possible. I remember her stewarding a small garden from time to time when I was growing up. We started one with blocks, soil, seeds, and a few starters that she helped me invest in. And that’s how I started homesteading!
Before I was a homesteading, homeschooling mom I was a professional musician and music teacher. I carried over my teaching experience into homeschooling my children, but I learned it was much different teaching your own children. And, when I started homesteading, I started with NO experience. It was something I never imagined doing. I had to do a lot of researching and learning each season. So, I know how hard it is to start homeschooling and homesteading with no experience!
After 2020
After the events of 2020, we saw the vital need to learn to grow, raise, and store real God-given food in abundance, and continue homeschooling all of our children. We felt God had a new call and season for us. So in 2021, we left everything behind, and moved from northwest Indiana to southern Georgia. And we just got started!
How we can help you
Now, I’ve homeschooled for 11 years and have 6 children of homeschool age with 1 more in waiting. And, we established our homestead in 2021 with lots of research and no experience. We built up gardens and livestock and had a small farmstead business within 2 years. Also, we stewarded a small farmstead by selling fresh eggs and healthy chickens to many happy customers! We started taking and completing several homesteading courses, and we continue our education every year. And, I’m always looking for ways to make things more time efficient by making them simpler to do and sustainable. When things are simpler, they are more sustainable in our already full lives.
Therefore, we want to help others do the same, no matter what their skill set is and no matter where they live. Building up all things home will allow us to sustain our families no matter what the future holds!
We are still learning on this adventure every day. But, we knew if we could do it, others could do it too! So, we started this blog to encourage other families to start homesteading and homeschooling, with Christ at the center, for a more abundant life no matter where they live; NO EXPERIENCE NECESSARY! We offer simple solutions, resources, and encouragement for your Christ-centered beginner homesteading, homeschooling journey.
Why did we want to start using a food dehydrator?
If you have read about our story recently, then you may know that we went from about 4 years of running a small backyard farmstead that provided fresh eggs to our community, and also raised hundreds of chicks to pullet age to sell for families to raise their own fresh eggs. However, after selling our home to move to more land, we did not find what we were looking for. This caused us to make a hard and totally unexpected choice..
We currently are renting in an HOA subdivision. And, we still practice every homesteading skill we can! We don’t have chickens, of course, but we still have two hives of bees sustaining our family’s year-round honey supply. We are allowed by our rental company to have a raised garden bed, so we are still gardening. I also invested in a vertical tower planter for my patio. We still practice indoor skills as well like growing, drying, and using herbs, cooking from scratch, sourdough, milling grains, and rendering broth.
Also, we have sourced local raw cow’s milk and use raw cream and make butter from time to time. We practice frugality and sustainability in all the things we do. But, we are committed life-long learners, and knew we needed to use this unexpected season to keep preparing for our future. So, continuing to build our list of skills is one reason we wanted to start learning to use a food dehydrator.

Dehydrating food is a form of food preservation.
Well, we have always had an interest in learning the skill of dehydrating food to prep our pantry. However, we were so busy with our chicken business, and investing in that, that we did not have the ability to learn. So, our current situation perfectly set us up to learn food dehydrating and many other skills we wanted to learn.
Dehydrating food is a form of food preservation. Dehydrating food is basically taking the moisture out of the food so that the food does not spoil making it sufficient for short-term or long-term storage. That’s the very elementary way to describe it. Food preservation has become one of our top values and reasons for homesteading.
Dehydrated foods are shelf-stable and have a long-term shelf-life making them perfect for emergency preparedness.
The year of 2020 was the most eye-opening time for many people regarding food stock and preservation. We have talked about the things that 2020 made us aware of and how we tried to help our family be better prepared for the future. It is the biggest reason we started homesteading.
We lived through blizzards in Indiana. Here, down south, it’s the hurricanes. Hurricane Idalia was a disaster that had not happened in our area for years (we were told by natives of that area). Then, Helene was even more destructive to our area. Both years left us with no electricity and some damage, but our city area was devastated the most.
We were, however, more prepared for Hurricane Helene after Idalia. Stocked on food, water, gas for the generator, and preparations for washing clothes by hand and drying clothes by line inside. And, we did this all with a one month old newborn baby. However, we knew we could have been even more prepared on the food side. Our food preparation was a mixture of canned and frozen foods, with convenience foods like store-bought bread, peanut butter and jelly, and unhealthy chips and snacks. Store-bought bread is one of my least favorite things. (Now, I make loaves of sandwich bread every week and also freeze bread.) Food dehydrating prepares your pantry with shelf-stable food for a longer time.
Dehydrating food is easier than canning!
Dehydrating food is similar to canning in the regard of being shelf-stable and shelf-life, but much less work! Something I say on here all the time is that I am always looking for ways to do things simpler, but more efficient. If something is simple to do, then it can be sustainable to keep up. Dehydrating food still requires washing produce, chopping or dicing, and sometimes blanching (all like canning). But then, you put that prepped food on trays, stick it in the dehydrator, and the preserving is pretty much hands off. All it requires from there is checking for food to be completely dried after recommended hours. So much easier than canning!
Dehydrating food can help lower food waste.
It is best to use fresh produce when dehydrating food, but experts say that it’s totally fine to grab that produce before it goes bad and get it preserved by dehydrating. The first food I dehydrated was organic celery. Celery is inexpensive, but full of nutrients, so I loved the idea of having a bunch of shelf-stable celery ready to throw into soups and stews for added nutrition. When I buy fresh celery and just throw it in the vegetable drawer, it hardly ever all gets used before going bad. So, I knew this would be a much more efficient and sustainable no-waste way to use celery. (I also took the bottom of the celery and re-planted it in my garden. It’s growing great! The leafy tops were used in my rendered broth.)
Dehydrating food is a space-saving way to store food.
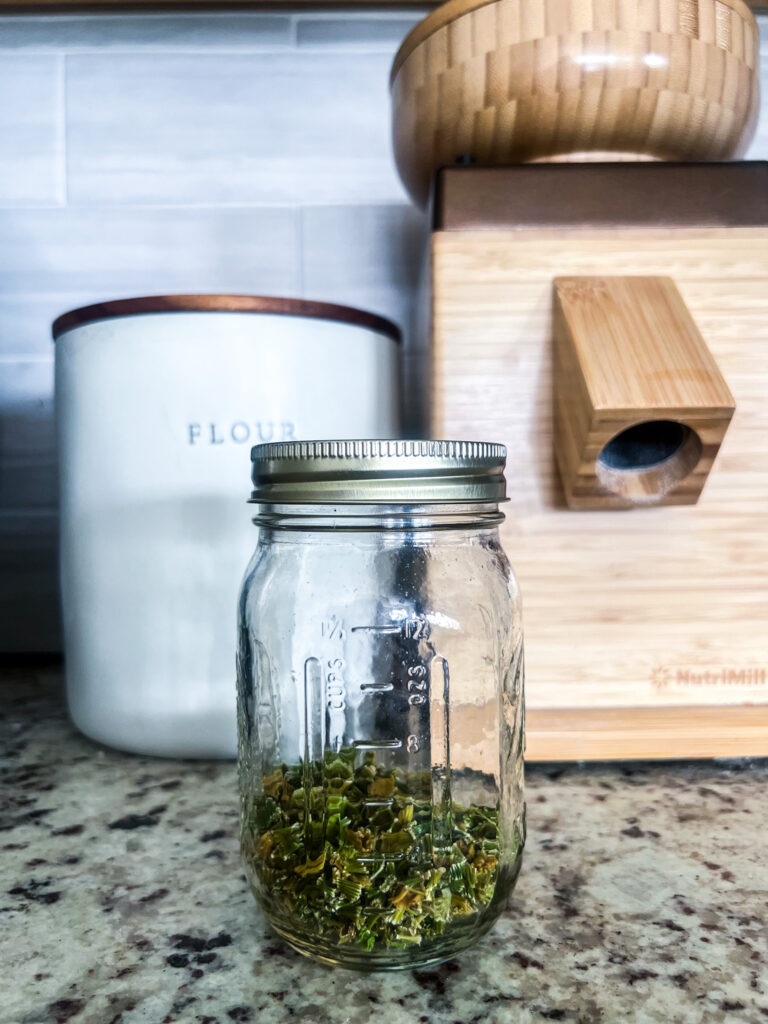
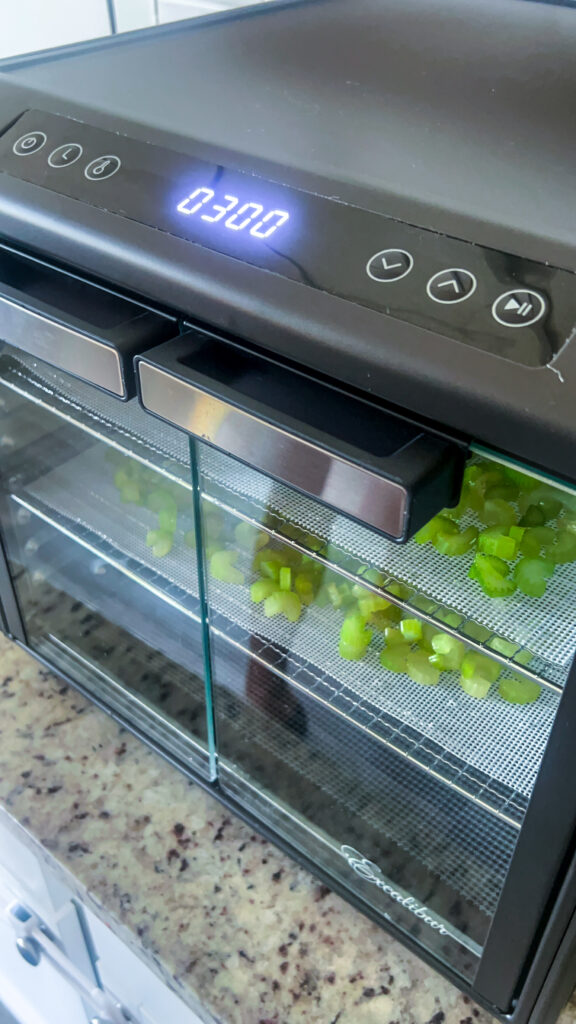
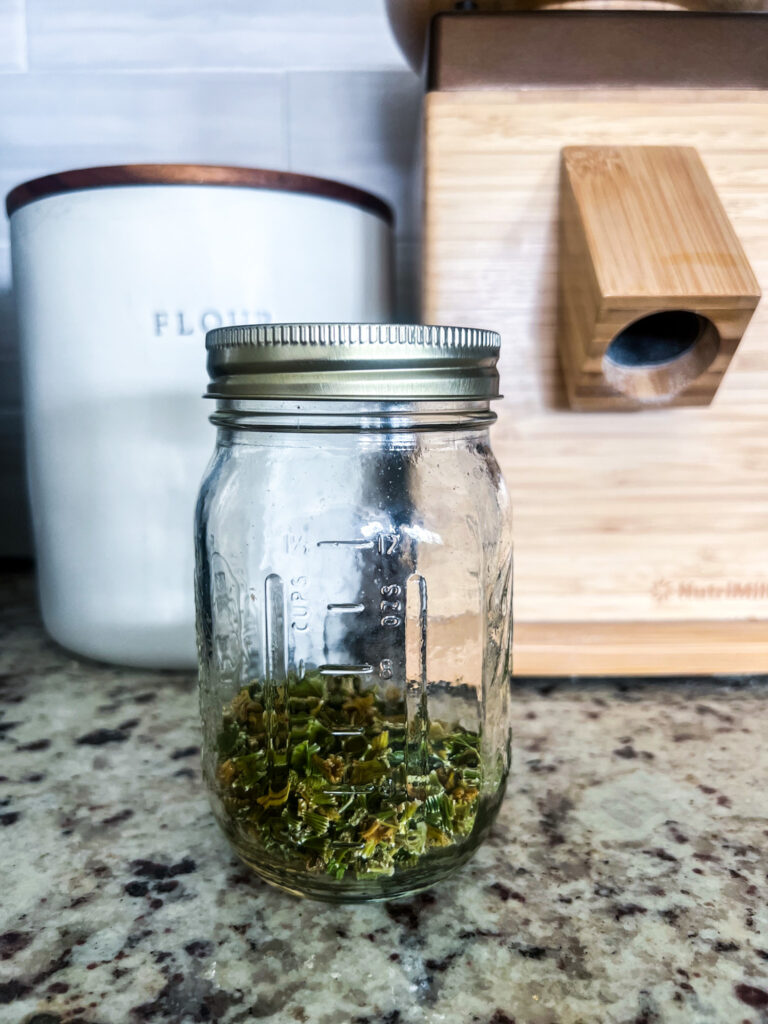
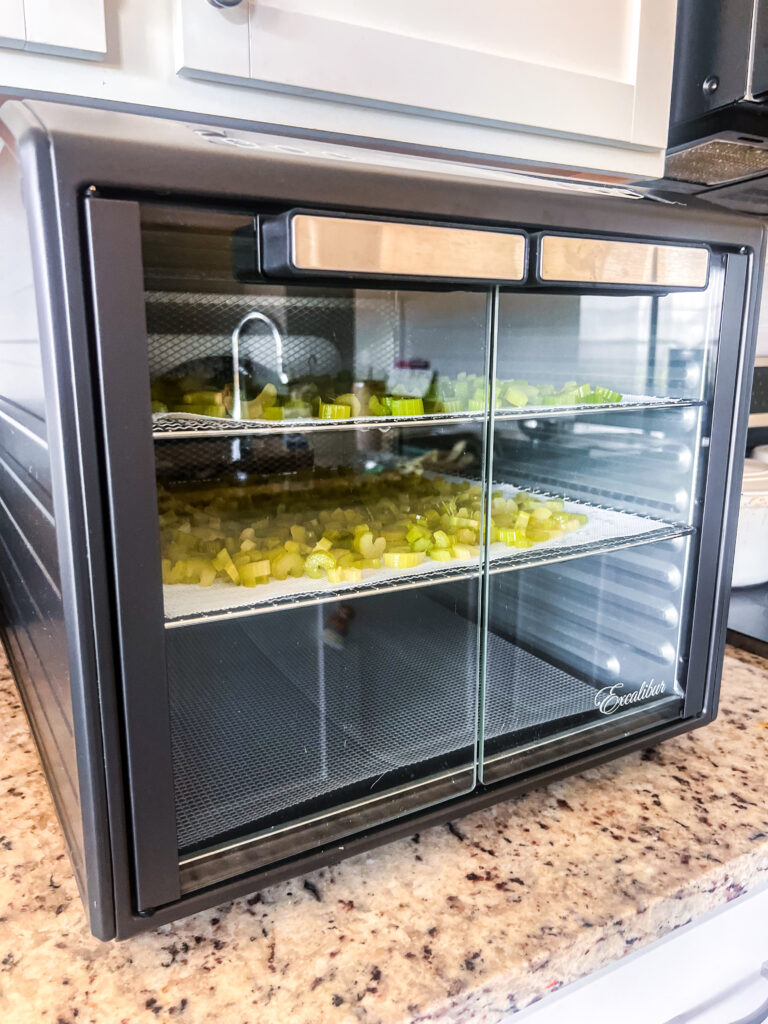
Maybe you have guessed this one, but since food is being dehydrated, it gets smaller. Therefore, dehydrating food saves a ton of storage space! When we bought a whole organic celery heart and a large bag of organic celery sticks for our first dehydrating experience we were shocked. These two big bags of celery that took up my WHOLE vegetable drawer in the refrigerator ONLY took up two of the ten dehydrator trays of my dehydrator. And, when it was dried, it took up only about a 1/2 cup of space in a mason jar! Wow! I had to make a mental note that I only needed to add a small amount to soups and stews because it would re-hydrate. And, I knew how much celery I started with.
Dry herbs, onions, and peppers faster.
We love to grow herbs and peppers to dry them so we always have the essentials for seasonings. And, we love to grow them because they are so beneficial, practically necessary, for holistic health. As we grow into expanding our herb garden the dehydrator will be so helpful to dry our herbs, onion, and peppers (like cayenne) faster. It is not necessary, of course, and at times we hang or lay out this produce to dry for weeks, but I’m not a fan of how much counter space and table space I lose during those drying times.
Using a Food Dehydrator the First Time: What to Expect that People Don’t Tell You:
1. Read the manual and instructions about how to clean and put it together before using the food dehydrator the first time.
This is definitely something to do when using a food dehydrator the first time. This may seem obvious and simple, but be honest. How many times have you opened a product and just started using it without looking at the manual and instructions? A lot of people do this, so don’t feel bad. I, however, am a recovering perfectionist and I read at least the beginning of most product manuals and instructions. My cast iron dutch oven? Read the manual and care instructions. My grain mill? Read the instructions multiple times. So, my new food dehydrator was no different. However, I waited until the day and time of dehydrating to read it.
That was not the best idea. I didn’t realize that you had to attach the power cord, and that the inside needed to be quickly wiped down. Nor did I even think about washing the trays before using. So, these things would have been no big deal if I did them ahead of time, but it delayed our process a bit later into the day causing our food to be completed late at night. Side note: it doesn’t always take long or require you to stay up late. We will talk about what causes varying drying times down below. Anyhow, read the manual and instructions before your dehydrating day and prepare your food dehydrator.
2. You may want to buy dehydrator sheets for the dehydrator trays.
This is not totally necessary. Food can be placed directly onto the dehydrator trays. And, most dehydrators have crumb trays in the bottom. However, I thought it would be easier to clean and maintain silicone reusable dehydrator sheets than dehydrator trays. There are also disposable food dehydrator sheets, and you can even use parchment paper, but we try to do things as sustainably as we can.
Also, some dehydrators come with a reusable dehydrator sheet for a tray. My Excalibur dehydrator came with one reusable sheet which was cool! But, I personally wanted to invest in more reusable sheets because I have a ten tray dehydrator. Reusable food dehydrator sheets are also helpful to ensure small pieces of food never fall through. Again, dehydrator sheets are optional, but I was really glad I bought reusable ones and have enough for all my trays. So, consider this option before using a food dehydrator the first time.
3. There are special food dehydrator sheets for making fruit leather.
For fruit leather (think like a fruit roll-up), there are also special reusable dehydrator sheets. There are disposable and reusable sheets, or you can use parchment paper as well. The reusable food dehydrator sheets for fruit leather are typically like a silicone tray without holes to ensure that no liquid falls through the trays. I was pretty amazed when I saw all the different types of dehydrator sheets that are out there. Research, as well as reading reviews and comments, can help make a wise choice on the type of food dehydrator sheets that will best fulfill your needs. If fruit leather is what you want to make in your food dehydrator the first time, you definitely want to consider the type of sheets you will use.
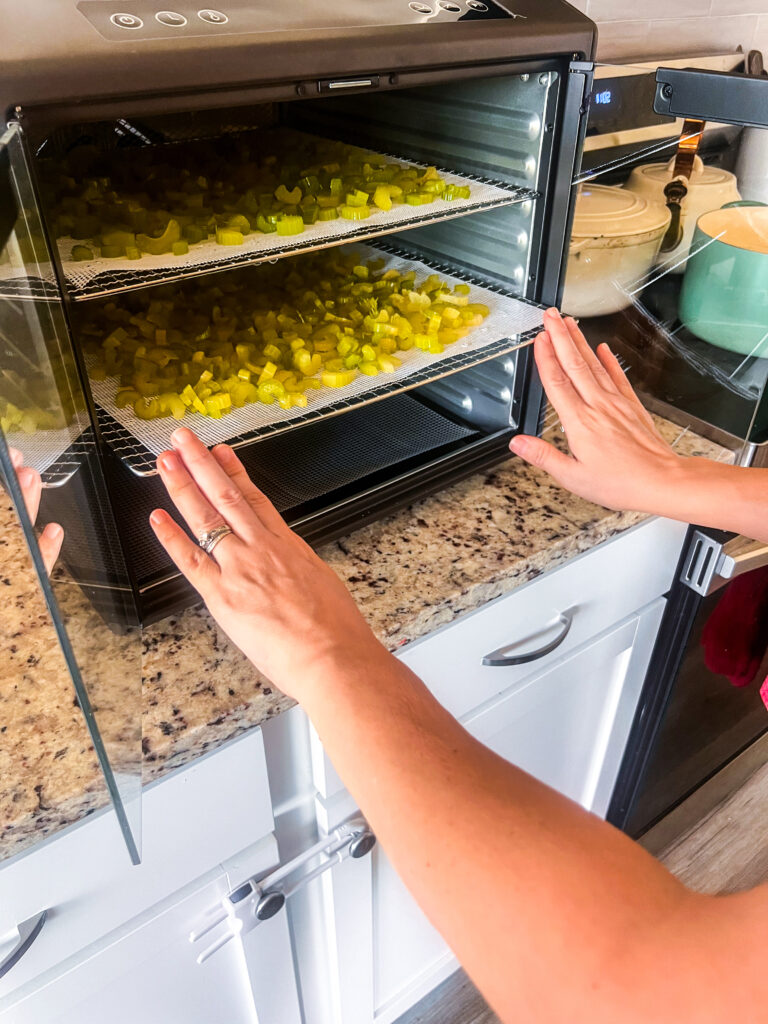
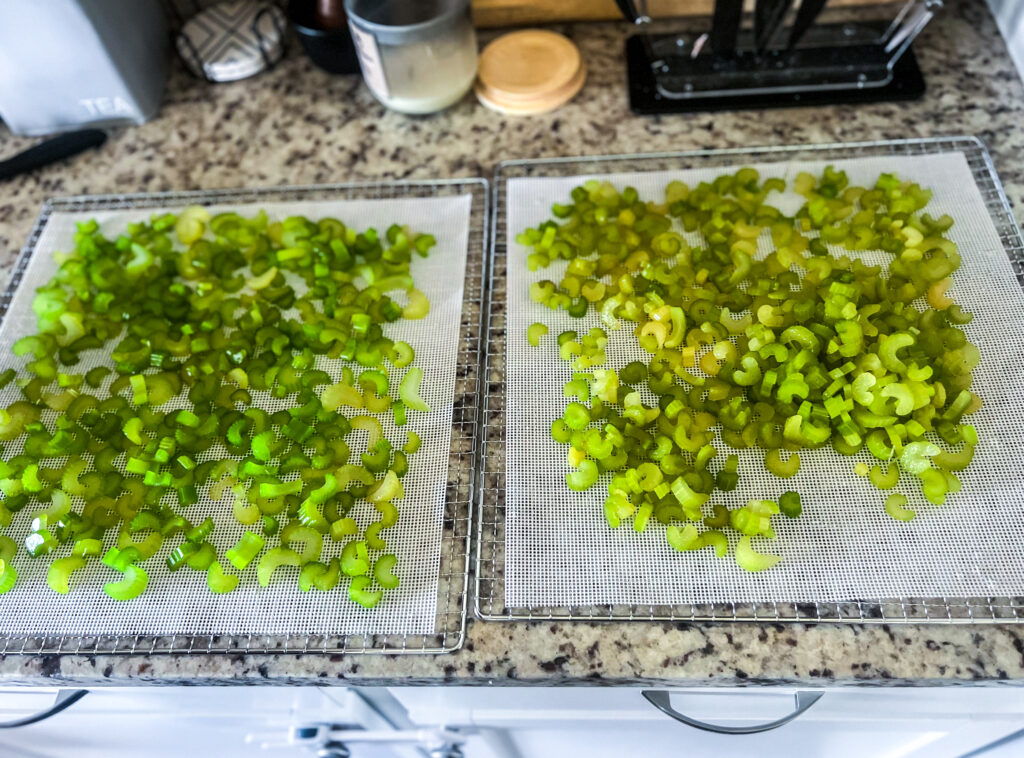
4. You may not use or fill as many trays as you think when using a food dehydrator the first time.
This was especially shocking to me. We purchased organic celery for our first food to learn to use the dehydrator. Celery is inexpensive, but full of nutrients, so I loved the idea of having a bunch of shelf stable celery ready to throw into soups and stews for added nutrition. When I buy fresh celery and just throw it in the vegetable drawer, in hardly ever all gets used before going bad.
So, we bought a whole organic celery heart and a large bag of organic celery sticks. We washed all the celery, cut to the 1/8 recommended size, blanched, and arranged it all on trays. I was a little stupified when I saw that these two big bags of celery that took up my WHOLE vegetable drawer in the refrigerator ONLY took up two of the ten dehydrator trays of my dehydrator. Wow!

5. You may still need to put all the trays in the dehydrator.
Consult your product manual to be sure, but our Excalibur dehydrator was created to work best with all the dehydrator trays in it even if they do not have food on them. Don’t worry, this doesn’t waste anything, in fact, it is most efficient! But, no one told us this. I found this one out by reading my product’s manual, and not all dehydrators are the same, so read that manual so you know what to do when using the food dehydrator the first time.
6. Use fresh produce for best results, but you can still use produce before it goes bad.
This is one thing that a manual might not tell you. But, some experts do. Of course, like with anything, fresh produce will have the best results, but it’s fine to grab your food before it goes bad and dehydrate it to prevent food waste. This, again, is one of the things I talked about (4.) with the celery and a reason I chose celery for my first dehydrated food. I wanted to stop wasting celery, but wanted it available for rendering broth and making soups and stews.
7. Dehydrated food gets really small and doesn’t take up much storage space.
Okay, we talked about this under why we started using a food dehydrator and in number 4. But, in case you skipped all the intro info or number 4 (no hard feelings, I do it sometimes, too), here is what we had to say.
These two big bags of celery that took up my WHOLE vegetable drawer in the refrigerator ONLY took up two of the ten dehydrator trays of my dehydrator. And, when it was dried, it took up only about a 1/2 cup of space in a mason jar! Wow!
Other fruits and vegetables will vary in size, but they will get smaller. Orange slices and apple rings will get smaller and you may be surprised at how many will fit in a jar or container. This is fabulous for prepping your pantry, especially if you are limited on space.
8. You may only need small amounts when using or re-hydrating.
In the case of the celery, I could probably use just a tablespoon or so of the celery in a soup. As it re-hydrates, it will grow in size and it will still add nutrients and flavor to the soup pretty much as if it were fresh. The amount of dehydrated food you use will depend on if you are snacking on it, or re-hydrating it to use. Dehydrated herbs, onions, and peppers go a long way. While snacking on some apple rings may end up being like downing a bag of chips! It all just depends on what you are doing. It is good to be familiar with the produce and how to use it before choosing to dehydrate it. After all, we are doing this to prepare our pantry for whatever the futures holds, so we try to preserve what we love and eat!
9. There are a lot of factors that can make drying times vary.
The product manual of your food dehydrator may have different drying times than mine or than someone else’s advice online. I cannot stress enough that you must read manuals! However, there are typically ranges of hours for drying times. This is because there are so many factors when it comes to how quickly your food will dry. Here are just a few factors to consider before using a food dehydrator the first time:
- the weather
- temperature in your home
- humidity level of your home
- the freshness of the produce
- air circulation around the dehydrator
- thickness of food
- sugar amount in the food
- fat content in the food
Disclaimer: Also make sure you read your product manual to know the best foods to dehydrate. But also know that the manual is not usually an exhaustive list. For example, high fat foods are not recommended for dehydrating because they can spoil in storage. Do your research.
These factors are mostly out of our control. So, control what you can and start early in the day!
10. Don’t start dehydrating food too late in the day! (stems from number 9)
Please don’t do this. If you read my story in number one then you know that I did this my first time. I read the product manual, but I waited until the day I planned to dehydrate and realized I had not prepped my food dehydrator. (Face palm!) Then, the celery took the MAX amount of hours to dry because we did it on a high humidity day, and my home was a warm 78 degrees because of south Georgia’s fall weather. (Second face palm!) So, be prepared before using your food dehydrator the first time. But, we went with the flow as usual and it was around 11pm that night when the majority was completely dried. A few pieces did not completely dry, and number 12 will tell you what you can do in this case.
11. It can be hard to determine whether food is completely dry or not when using a food dehydrator the first time.
This is not just a first time experience thing. This can be the first time you dehydrate any new food. You may need to get the hang of the texture that each food should be to determine if it is completely dry. The good news is that your product manual may include information on the texture each food should be when it is completely dried. Typically two words are used to describe properly dehydrated foods. “Leathery” or “brittle”. This information can also be found on preservation websites, and food dehydrating recipes. I suggest you be familiar with the recommended results before using a food dehydrator the first time.
12. You can put food that didn’t completely dry in the refrigerator or dry again.
Okay, so this is one tip that I did learn from a course. You have two options when some of the food is not completely dry. The first option is to run the dehydrator again. The teacher of the course taught the second option. If almost all of the food is completely dry, and you don’t want to keep drying, you can just throw the pieces that aren’t completely dry in an airtight container in the refrigerator. Use those pieces within a few days, though. I did this with a small amount of the celery because we finished about 11pm and I was not going to stay up any later.
13. There is a process called “conditioning” that should be done with your dehydrated food before storing.
This process can look a little different depending on what food you are dehydrating. You can research more information as it pertains to the food of your choice. But basically, “conditioning” is a process to determine if dehydrated food is completely dried and ready for long-term storage or not. It requires putting the dehydrated food into an airtight container and placing it somewhere you see it every day. Then, you can turn the container upside down each day for seven days to see if food sticks or if there is any condensation at all that would indicate the food is not completely dried and ready for long-term storage.
If it is not dry, you can dehydrate it again. However, if it shows signs of mold, throw it out or compost it. No sticking or condensation after seven days proves it can safely be tucked away in a your cool, dark pantry.
14. The food dehydrator can get hot and may have spots where warm air comes out.
This is another thing to check in your product manual. Our dehydrator’s manual specifically told us to make sure we placed it on a heat resistant surface while running it. It also said to keep it away from anything that should not get hot. There are also safety instructions that remind you to keep it out of reach of children. They do not have child locks that I know of and open easily.
Another note is to beware that some dehydrators may have spots where the warm air comes out to help with circulation, so think about where you put your dehydrator and how you face it. The warm air, however, is not usually hot or dangerous. It is just something to consider when placing.
Conclusion
We have talked a lot about many things to expect and consider before using a food dehydrator the first time. Our prayer is that our first experience, including our mistakes, will help you prepare for your first time using a food dehydrator. We really hope this was helpful! If you have any questions, or more advice for beginners, leave them in the comments below!
Live abundantly, Friends!

Pin it!
If you enjoyed this post, please share by pinning the image below:
Shop this Post:


 How to Keep Chickens Cool with Peppermint Infused Ice Cubes | Raising Chickens
 15 Health Benefits of Raw Honey | Honey
 How to Make Raw Milk Butter WITHOUT a Churn | Homesteading
Leave a Reply